Monday, September 9, 2013

Card Of The Week - Center Step Card

This weeks card of the week features a "Thank You" card I made last week.


The design is called a "Center Step Card". It's actually quite simple. I made a little template, which shows you where you have to fold and cut the paper. 

If you have a Silhoutte machine, it's even easier to make this card, since they have cutting file for this card, which means that no cutting and scoring is necessary from your side. 
The "Thank You" phrase is also a Silhoutte cutting file, which makes this card a project you can create in no time.

The image of my card is a stamp from "Lily Of The Valley" (http://www.liliofthevalley.co.uk).
I just adore their stamps! 

Enjoy!


Wednesday, September 4, 2013

Tea-light Card - Tutorial

This weeks card of the week features one of my favorite card designs. 
I usually put 4 scented candles in the gift compartment of the card, but it's also a great place for candies, hot chocolate mixes and any other kind of small gifts.

Enjoy!

---------------------------------------------

Tutorial:

Template 1 (box and bookmark holder). The green lines need to be scored.


 Template 2: (deco element) You can use any kind of solid or patterned paper.


Template 3: (bookmark) Use any kind of card stock for this


Step 1:

Cut out "Template 1" and score along the green lines.


Step 2:

Cut out "Template 2"


Step 3:

Flip "Template 1" around and use adhesive to attach "Template 2" to it.


After that step your card should look like this:


Step 4:

Flip your card around again and add adhesive (I used a tape runner for the straight lines and glue dots for the corner) to the latches (hatched with white lines in my images), the back side of the very left lid and to the areas marked with white crosses.


Step 5:

Fold over the right side of the card.


Step 6:

Fold the left side of the card over and attache the very left lid (the one with the glue on the back side) to the base of the card so that a "tunnel"appears.


Step 7: 

Close lid on bottom of the "tunnel".


Step 8:

Fill "box" (I used 2 tea-lights with pumpkin scent and some candy corn, which I put in a plastic bag).


Step 9:

Cut out "Template 3" and cut a small opening on top of the book mark. This slit should be big enough, so that you can pull through a ribbon later on.


Step 10:

Decorate the bookmark.


Step 11:

Slide bookmark into compartment.


Step 12:

Decorate the card.


Monday, September 2, 2013

Paper Bag Mini Album/ Card

I was asked today if you could join my paper-bag mini album class, even if you don't like to scrapbook.
Of course you can!
Here are some pictures of the mini album/ card I made for Christmas. Instead of sending Christmas cards, I sometimes send out mini albums containing some of my favorites cookie recipes.


Front page: There is an opening in the side of the first page, which holds a tag, on which you can write your message.


Front page close up:

 Page 1:

Page 2:


Page 1+2:


Tuesday, August 27, 2013

Altered Binder Clips


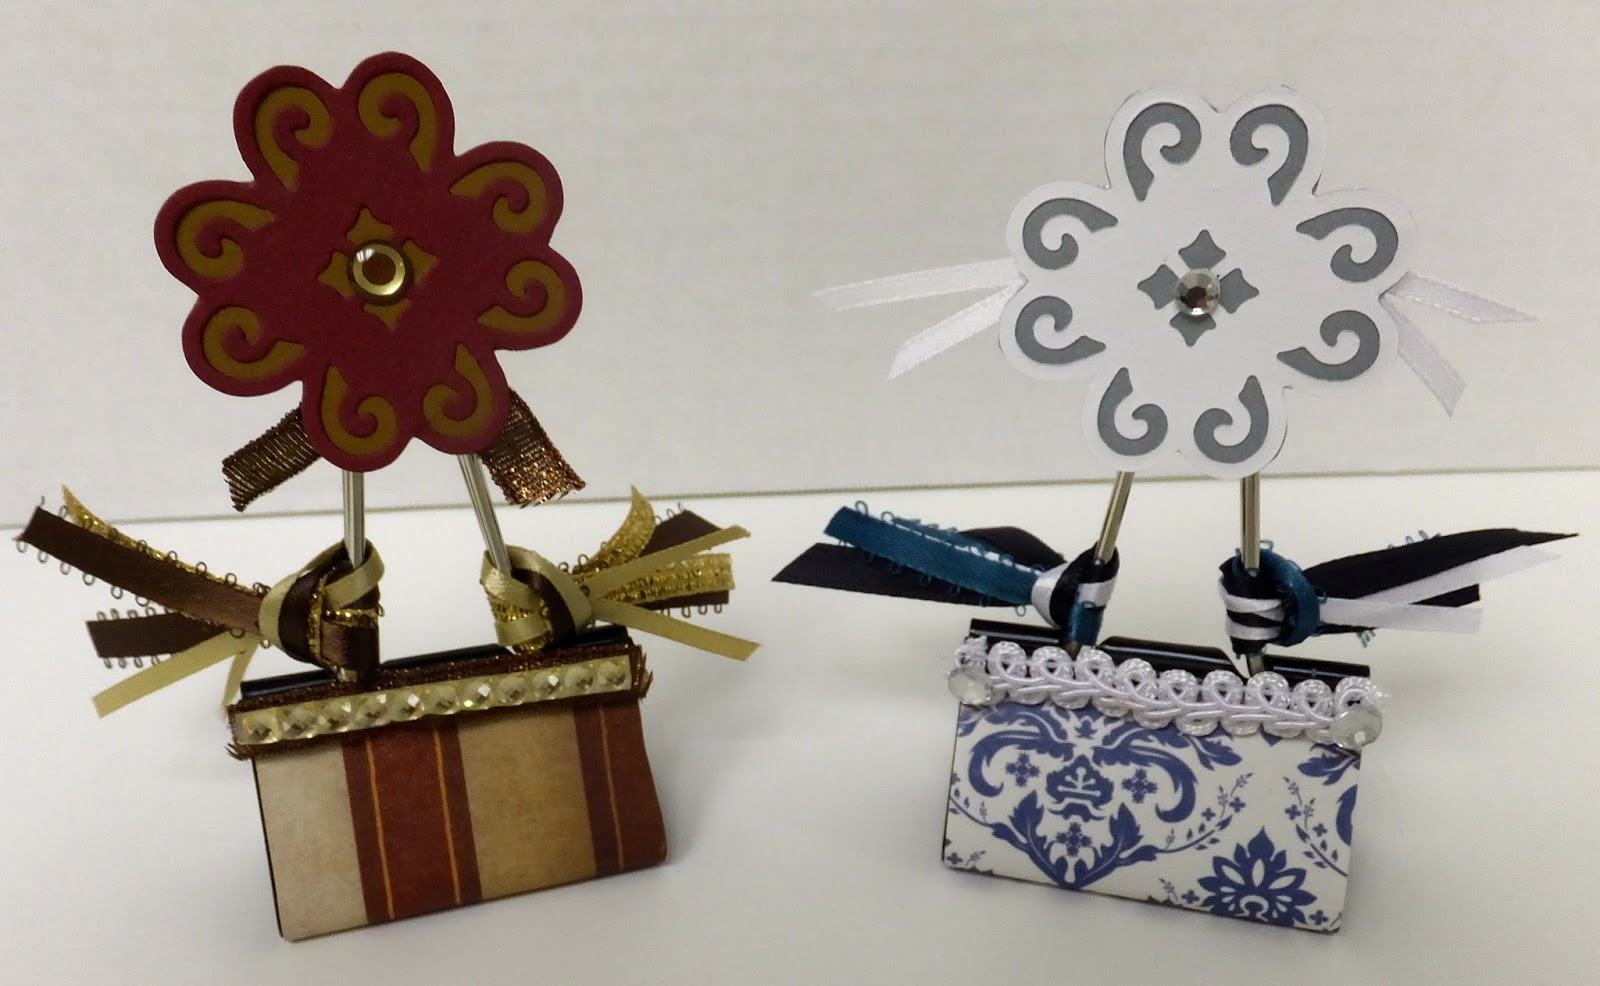
Today I want to show you some name tags holders, which I made for one of my workshops. 

I used for the base large binder clips (you can get them from Walmart, Staples or sometimes even the Dollar Store)and it literally took my just a few minutes to make a dozen name tag holders.

Here is what you need:

- large binder clips (color does not matter, since you will cover most of the clip with paper)
  * you also can use smaller binder clips, I just had the large ones handy
- decorative paper or solid paper (it's totally up to you)
- Glue Dots lines
- precision point adhesive 
- misc. embellishments (ribbons, adhesive rhinestones, die cuts...)


Instructions:

- Cut a 8.5cm X 5cm piece of paper (if you use smaller binder clips, you need to adjust the size of the paper accordingly)

- Use the glue lines and glue them to each side of the paper and add 2 extra lines to the middle of the paper.

- Glue the paper to the base of the binder clip. 

- Now you can decorate the clip with anything you want. I like to cut a few pieces of ribbon and knot them to both sides of the metal hook. For my name tag holders I used flower die cuts, which I decorated with adhesive rhine stones.

And that's it!

These are really easy to make and what I love especially is, that you can use them for many occasions:

- Place card holder (weddings, baby showers)
- Recipe holder
- Photo holder (for your desk for example)
- Gift card holder
- Dinner table place card holder (Christmas, Thanksgiving)
- Party favors
- Stocking stuffers
- Thank you note 


Enjoy!


Thursday, August 1, 2013

Card Of The Week (Sweatshirt w/ Zipper)


It's time for this weeks card of the week.

This is currently my ultimate favorite card design. You can completely change the look, but simply using patterned paper.

I bought this stamp from "Too Much Fun Rubber-stamps"at a craft fair a few weeks ago. They also have an online store, which you can find here:

http://shopping.toomuchfunrubberstamps.com

I absolutely love the surprise effect with the integrated zipper. Of course you also could make the card without the zipper, but I personally prefer it with the zipper since it's so unique.


Front Of Card With Closed Zipper:


Front Of Card With Open Zipper:

Card Inside:


Monday, July 29, 2013

Tile Coasters

I am super exited to share this new project with you.

It's so simple, cheap and so much fun ;0)

All you need is the following:

- white tiles (11cm X11cm in my case)
             -> you can get these for less then $0.20 at any Lowe's
- Mod Podge (what would we be without it ;0)
- small sponge brush
- clear acrylic sealer (spray can)
- felt pads 


Step 1:
Measure your tile and cut the paper/ image you want to add slightly smaller. 
My tile was 11cm X 11cm, so I made my paper 10cm X10cm.

Step 2:
 Use the sponge brush and add a thin layer of  Mod Podge to the back side of your paper/image.

Step 3:
Place the paper (Mod Padge side facing down) on the tile and make sure it lays flat on the tile. 

Let it dry for 15 minutes.

Step 4:
Add any kind of embellishments you want (rhinestones, stickers...). But make sure that, if the embellishments are 3 dimensional (like rhinestones), that they are positioned towards the edges of the tile. 
Otherwise you will not be able to put anything on the finished coaster afterwards.

Step 5:
Once you are satisfied with the layout of the tile, take it outside or to a well ventilated area and spray it with the clear acrylic sealer.
Let the sealer dry for 15 minutes.

Repeat step 5 two more times.

Step 6:
Add the felt pads (one for each corner) to the back side of the tile. This will prevent your coaster to scratch any surface underneath it.

And that's it. 

Didn't I say it's fast and easy ;0)

Enjoy!

Here are some samples of my work:


For this set I used in addition to the 11cm X 11cm tile also a slightly larger one 15cm X 7cm. 
While I use the square tile for my coffee mug, I put creamer and sugar or some cookies on the rectangle one.

I used paper from the "Every Day Tango" designer paper stack, the word "Cafe" I printed with the Silhoutte out of grey adhesive vinyl. 


I got the digital images of the boatswhich I printed on regular paper, from Etsy. I bought them from CobraPrints, which has a large selection of cute images. 

For the last tile, I used Mod Podge to cover the bottom with sand and small sea shells.

Important: If you add sand and sea shells to your design, make sure that you spray your tile with the acrylic sealer, after you added these items.

For these 2 tiles I used as background paper from the "Every Day Tango" designer paper stack.
I got the digital images of the coffee mugs, which I printed on regular paper, from AudreyJeanneRobertsEtsy store. Her images were a perfect fit for my coasters. 
For this tile I used as background paper from the "Every Day Tango" designer paper stack. The image is a sticker I had laying around.